Sunday, 10 November 2013

Share this Post Share to Facebook Share to Twitter Email This Pin This

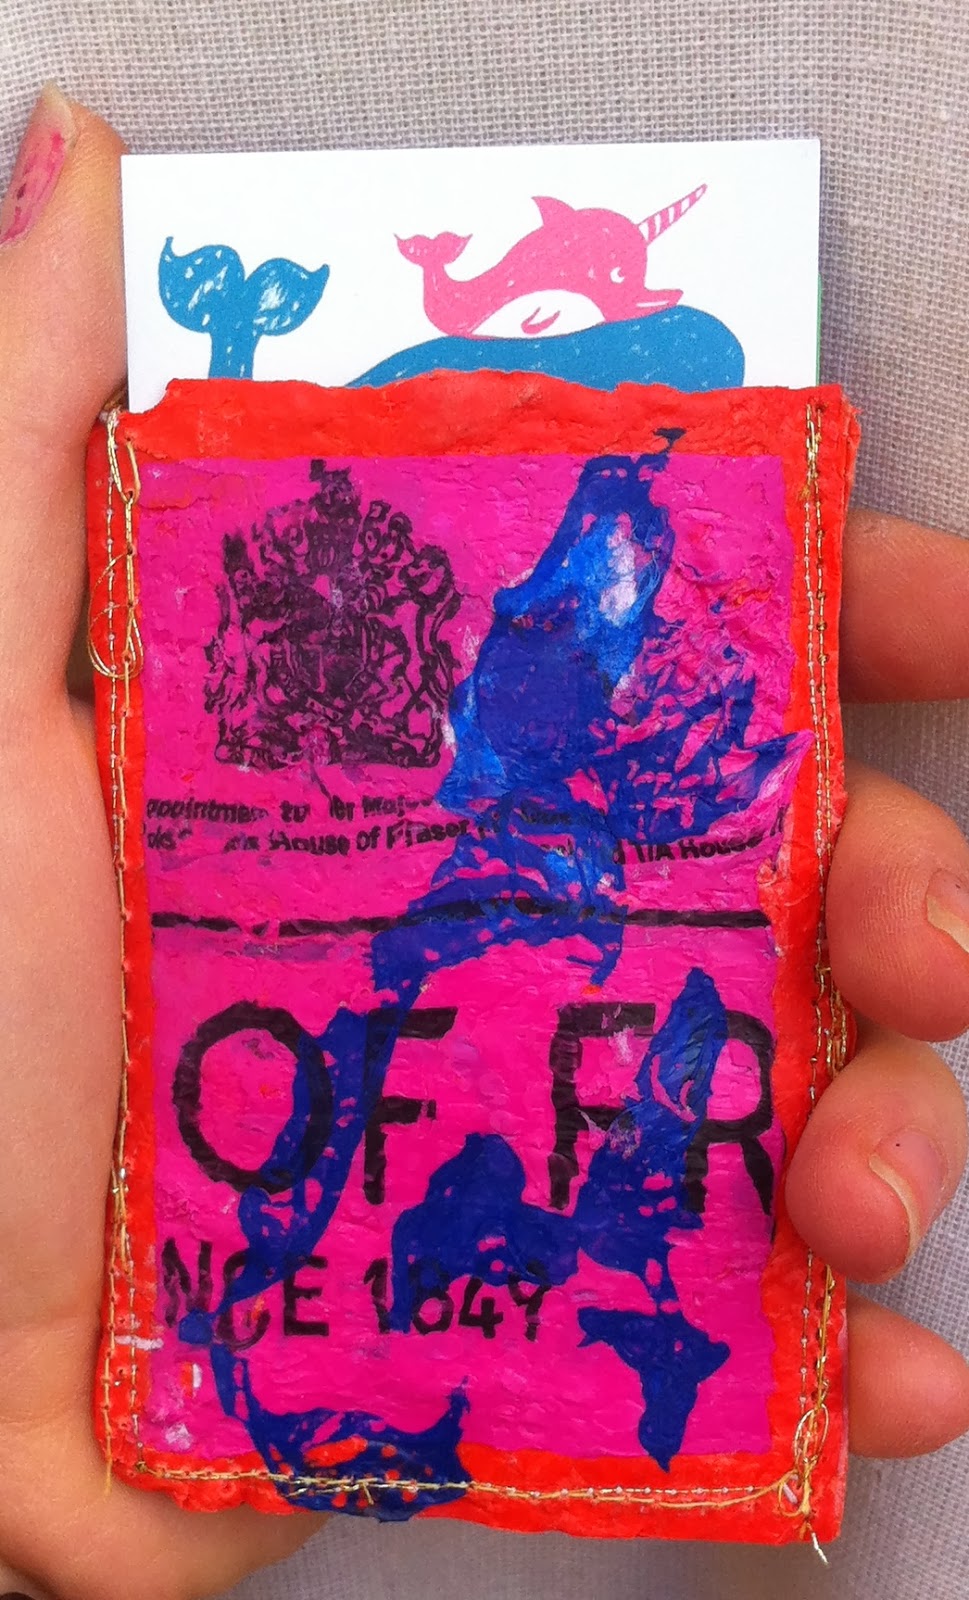
Up-cycled Plastic Bag Wallet

Another idea for how to up-cycle your plastic bags! I have become quite obsessed with trying to find ways to make by plastic bags into little items, haha! 
For this wallet I used 2 H&M bags and 3 different Paperchase bags. 


To make the wallet I made the plastic fabric (fused together plastic bags) - use this link to show you how fuse the fabric: http://www.youtube.com/watch?v=PNziDXtm1SA.
To make a wallet that is similar to this (although I changed the design on the inside quite a lot) then watch this video: http://www.youtube.com/watch?v=FYnJrzQoAA4.
Share this Post Share to Facebook Share to Twitter Email This Pin This

My First Delicious taste of Cashew Based Raw Ice Cream!!!

I know that this might not be amazing to most of you - but to a still baby vegan, trying this raw cashew ice cream for the first time was SERIOUSLY exciting! While in Camden I suggest you visit the Insprial Lounge Cafe on Camden High street. It has got an amazing selection of raw desserts, ice creams, smoothies, raw sandwiches, vegan burgers, hot stews and pies and MUCH MUCH more! AND THIS is where my vegan assuring, mouthwateringly delicious first taste of raw ice cream takes place. If you are baby vegan like me and ice cream is just still too much of a sirens call for you, then I implore you to give this a try. I REALLY LIKED IT (if you can't already tell!) The texture is thick and creamy and absolutely the texture of ice cream, with only a hint of the cashew taste coming through - it would be like tasting real cashew flavoured ice cream.

I have tried other vegan ice creams, like So Delicious, and its good - but I KNOW that it is vegan ice cream. However with the cashew one, it is the exact texture and creamy flavour of real ice cream!


I had the Dandelion coffee and Amaretto flavour, which was really good - but they had a wide range of other flavours and when I am up there again I think I will give the Maple Pecan one a try!

Share this Post Share to Facebook Share to Twitter Email This Pin This

How to make AMAZING up-cycled card holders!

Can you find a better way of using all those plastic bags than these card holders???? They are so fun to make and soooo easy, and you can experiment with so many different colours and patterns!

This idea came about yesterday, when me and my Mum decided to take a wander through the Renegade craft fair up in London. From wall to wall the place was laden with designers, artists, jewellers and knitters - it was craft heaven! I was so inspired by all the unusual designs and fun items that I rushed home to give all that I had absorbed a try. This idea was first on my agenda, after seeing beautiful card holders and wallets made out of mere plastic shopping bags!

SO VIBRANT!

 Things you will need: 

  • Around 4 - 5 plastic shopping bags (any kind will do - I used 2 Sainsburys shopping bags, 1 House of Fraser one and then decorated it with a plain blue off licence bag.) 
  • Sewing machine (Optional - you can always try by hand but I think it would be quite difficult) 
  • An iron 
  • Lots of sheets of paper / grease-proof paper (recommended, as it is easier to peel off the plastic)  
  • A average sized card (like a credit card, oyster card etc.) 
  • Thread for the sewing machine 
  • Scissors 

Method: 

  1. Set Iron to a MEDIUM heat - on the DRY setting (you don't want any steam) 
  2. Prepare all the bags: Trim off the handles and cut a strip of the bottom of the bag. 
  3. Lay out the plastic bags in the layers that you want them to be in when you fuse them together - this will make the base layer of your plastic fabric (you want at least 2 - 3 bags layered on top of each other for this base layer so that it is sturdy). So in my example (pictured above) I used the two Sainsburys bags as my base layer. I flattened them out, layered them on top of each other and fused them together (next step). 
  4. On the ironing board lay down lots of sheets of greaseproof paper / plain paper so that no plastic is touching the ironing board. Then repeat this so that the paper covers all the plastic - you don't want your iron to get ruined! 
  5. Iron over the paper for several minutes or until you have a flat sheet of plastic fabric sandwiched between the paper. Peel off the paper. 
  6. So here you have your first plastic fabric sheet! 
  7. If you want the framed effect (see in the picture how the sainsburys bags frame the house of fraser one) then repeat steps 2-4 with the other bag (in my case the house of fraser bag)
  8. Lay a credit card on the sheet of plastic and draw around it - leaving a 1cm seam allowance. Repeat this and cut out the two rectangles from the fabric. 
  9. If going for the framed effect cut out two slightly smaller rectangles from the other bag. Lay them over the first cut rectangles, sandwich between paper and fuse together. 
  10. Embellish my cutting out shapes from other plastic bags and laying them on top of the pieces for the card holder. Sandwich between paper and iron over it until it has fused. 
  11. Take the two pieces, place them together and run a running stitch along the two sides and bottom. 
  12. AMAZING!! You now have your very own up-cycled plastic bag card holder!!!!! 
If you find it hard to follow these instructions (don't worry I learn from visually seeing how it is done - so I understand!) then this video is really helpful to show you how to fuse the bags together! 
http://www.youtube.com/watch?v=PNziDXtm1SA - However I didn't fold the bags (to make it 8-ply) I just layered bags on top of each other and that worked really well. :)
Have fun with this - you don't have to copy my design (you can if you want!) but take the most amazing plastic bags (I don't know about you - but in my household we are unable to throw away really pretty plastic shopping bags, but never know what to do with them!) and turn them into useful card holders, wallets, make up bags, pencil cases - anything you want! 

Sunday, 13 October 2013

Share this Post Share to Facebook Share to Twitter Email This Pin This

Autumn Mood Lentil Stew (Mmmmm....)

I LOVE AUTUMN VEGETABLES!! There is something about sitting down on a cold night with a steaming pot of stew and some roasted squash, in front of a roaring fire and watching some rom -com!  Ahhh that is just the best!!! This stew will warm your insides and is perfect for one of THOSE nights (mentioned above!). (Do you know what nights I mean?) Haha :)


Ingredients 

  • 750ml of vegetable broth (I use a 1 kallo veg stock cube) 
  • 200g of red lentils 
  • 3 tbs of chopped tomatoes (I used from a tin but you can 
  • Two handfuls of spinach 
  • 1 large sweet potato or 1/2 a squash cut up into small chunks 
  • 1 tsp of medium curry powder (I used one that I got in whole foods and it is the BEST) 
  • 1/4 tsp of garlic granules 
  • 1/2 tsp of cumin powder 
  • 1/4 tsp of garam masala 
  • dash of of each: turmeric, ground cardamom, ginger, amchoor powder (optional) 

Method 

  1. Chop the sweet potato/ squash into small chunks and chop up the spinach into strips 
  2. Put the water and lentils into the saucepan and cook on a high heat until boiling. Turn onto a low heat and simmer. 
  3. Add the spices and the chopped vegetables to the lentils 
  4. Stir and then put a lid on the stew and simmer for 20 - 30 mins or until the lentils are mushy and the sweet potato/ squash is very soft. 
  5. Enjoy on a bitterly cold Autumn/ winter evening! :) 

Tuesday, 8 October 2013

Share this Post Share to Facebook Share to Twitter Email This Pin This

Apricot Teriyaki Vegetable Noodle Soup

This recipe is adapted from a recipe I found in a book, which was an Apricot Teriyaki stir fry, and I though it was absolutely delicious. However I recently found these yam noodles which claim to have 0 calories in them, so I wanted to give them a try. They have the same kind of texture as slightly thicker rice noodles, and take the flavour of whatever they are put with - so I highly recommend them, as you wouldn't really be able to tell the difference between them and real rice noodles!
This is a delicious hot soup that is both filling, but great for those who are trying to keep it low on calories!


Ingredients 

Serves 2 
  • 1 leek 
  • 1/2 red onion 
  • 3 slices of white cabbage 
  • 75g of baby mushrooms sliced up 
  • 1/8 of a large daikon radish 
  • Optional: 1 carrot (only not added because I didn't have any) 
  • 1 packet of yam noodles (Shirataki Noodles) / 1 packet of miracle noodles / 2 portions of noodles of your choice
  • 1-2 cloves garlic 
  • 3 tbs of vegetable broth + enough to cover the vegetables and noodles 

For the Sauce 

  • 5 tbs of apricot jam (I use St Dalfour) 
  • 1 tbs of tamari 
  • 1 tsp of teriyaki sauce 
  • 1 tsp of brown rice vinegar 
  • 100ml of veg broth 
  • 1 tsp of cornflour 

Method 

  1. Chop up all vegetables and mince garlic 
  2. Heat up the 3 tbs of veg broth in a medium sized saucepan over a medium heat and steam fry all vegetables (including garlic) in the broth for around 8mins 
  3. While the veg are steam frying, mix all ingredients for the sauce together 
  4. Add to the vegetables and mix in thoroughly. Add yam noodles (or precooked noodles of choice) and remaining veg broth - enough to cover the vegetables and noodles. 
  5. Put a lid on the saucepan and let simmer for around 8 mins 
  6. Serve and enjoy! Mmmm...


Saturday, 5 October 2013

Share this Post Share to Facebook Share to Twitter Email This Pin This

Baked Apple Dessert

This dessert is a super delicious but super healthy alternative to apple pie or apple crumble! As I said before, I am looking for ways to use up the apples I collected from my Grandmother's apple tree, and found this as a perfect healthy dessert to use them in. It is also so easy and quick to make!


Ingredients 

  • 2 large cooking apples / 4 granny smith/ eating apples 
  • 3 tbs of water
  • 3 tbs of raisins 
  • 1 tsp of cinnamon (your choice on how much you want here) 
  • 4 cloves 
  • Optional: 1/4 tsp of almond extract 
  • 1 stevia packet (or sub in 3 tbs of sugar)
  • 1 tbs of coconut palm sugar or 1 tbs of maple syrup/ honey/ brown sugar 
  • 35g of xylitol or coconut sugar / caster sugar or brown sugar 
  • 35g of Jumbo oats (for topping) 
  • 35g flour of choice (I used oat flour) - topping
  • 3-4tbs of milk -topping
  • 1tbs of oil (melted coconut oil or olive oil) - topping
  • Optional add ins: 3 tbs of nut of choice (walnuts or almonds might be good)
NOTE: In the photo above I didn't make a topping (only sprinkled some oats over) - however the topping I have put into this recipe I use on special occasions and it is very delicious! 

Method 

  1. Preheat oven to 180 degrees Celsius 
  2. Peel and core the cooking apples then cut up into smallish chunks 
  3. Heat up the water until boiling then add the cooking apples, raisins, spices, almond extract and sweetener
  4. Cook on a low heat for around 20-30 mins or until apples are relatively soft but not pureed (the cooking apples that I have only take around 10 mins to get really soft) 
  5. Meanwhile mix all the topping ingredients together - it will be softer and of a more squidgy consistency than normal apple crumble topping at this stage but don't worry it gets more crumbly in the oven (if you want a less healthy but more authentic version of apple crumble topping sub the 4 tbs of milk to 4tbs of margarine). It should still be quite crumbly, so if it sticks together in one big clump like a dough then add more flour. 
  6. Pour apples (make sure to drain out any additional water and take out cloves) into a heat proof dish and mix in optional nuts. Then crumble over the topping. 
  7. Bake in the oven for 30 mins or until the oats on top have gone a golden brown colour. 
  8. Enjoy! 
Share this Post Share to Facebook Share to Twitter Email This Pin This

Unsweetened Apple-sauce Recipe

On visiting my Grandmother's house I didn't expect to come home with bags and bags of apples, but I did and now I am trying to find ways of incorporating them into my cooking! The most important recipe I wanted to try was apple-sauce, because it is so useful to use in making all sorts of delicious bakes as a sweetener and also as a replacement for oil and butter. So first up when I came home I got started on peeling and coring a few of the apples to put in the sauce... 
My sauce is unsweetened, using only apples and some squeezed lemon, however you can add your own sweetener, cinnamon, maple syrup etc. to make your own flavours!

Ingredients 

(Makes around 1 medium sized jar) 
  • 4-5 large cooking apples (will be around 1.2 kg) - you can use normal apples too but make sure you use to same amount (1.2kg) 
  • 160ml of water 
  • Juice of half a lemon 

Method 

  1. Peel and core apples and cut into smallish chunks 
  2. Heat the 150ml of water until boiling and add the lemon juice and apples to it 
  3. Turn the heat to low and place a lid on the saucepan
  4. Let apples simmer for around 15mins. By this point, when you take the lid off the pan, the apples should have become a apple-sauce mush and puréed themselves (I didn't even need to put them in the blender) 
  5. Add to a jar and let cool before putting on the lid. Store in the fridge and enjoy in your cooking!