Friday, 2 August 2013

Share this Post Share to Facebook Share to Twitter Email This Pin This

Meaty (Juice Pulp) Vegan Burgers!


Ok so here is another way that you can use that juice pulp without wasting it! I hate throwing it away so I have come up with ways I can incorporate it into my meals!

Save your pulp from the rainbow juice - make sure you take the pulp out before adding the lime (I don't know about you but I wouldn't want lime in my burger!) 

The pulp 'meat' 


Serve with tomato puree/ tomato ketchup, mustard and a side salad

Ingredients 

(Makes 4 burgers) 
  • All the juice pulp (EXCEPT FOR THE LIME PULP) from the rainbow juice recipe 
  • 1 onion 
  • 2 garlic cloves 
  • 4 tbs of water + small pinch of a veg stock cube
  • 3 tbsp of gram flour/ any flour of your choice 
  • 1 1/2 tbs of nutritional yeast 
  • 1 tsp of cumin 
  • 1/2 tsp of ground coriander
  • 1/4 tsp of turmeric 
  • 1/4 tsp of chilli powder (more or less to fit your taste) 
  • 1/2 tsp of onion powder 
  • 2 tsp of egg replacer + 1 1/2 tbs of water 
  • 1 tsp of baking powder 
  • 1tbs of tamari 
  • 2 tsp of tahini 

Method 

  1. Preheat the oven to 180 degrees celsius and grease a baking tray with coconut oil 
  2. Chop the onions and mince the garlic. Sauté them with the water and stock cube until the onion is translucent. 
  3. Beat the egg replacer with the 1 1/2 tbs of water. Set aside
  4. In a mixing bowl add all the ingredients including the onion and garlic and egg replacer. Combine thoroughly. 
  5. Make thick burger patties with your hands and lay onto the baking tray. 
  6. Bake for 15 mins on one side and then flip them over and bake for another 15 mins on the other side. 
  7. Serve with tomato puree/ tomato ketchup, mustard and a side salad. You can sprinkle some nutritional yeast on the top of the burger for an extra 'cheesy' flavour! 

Share this Post Share to Facebook Share to Twitter Email This Pin This

My Recent Visit to Rome

SO I recently visited Rome, probably one of the most beautiful cities in the world (that I have seen so far!) The food, the atmosphere, the heat, the ornate buildings, the history, the fashion and I could go on forever, made this one of my favourite trips! Unfortunately vegan food was not on the agenda so I had to take a mini break from being strictly vegan (otherwise I would not have been able to eat!)

We walked around all day and all night and by the end of the three day trip my feet were aching, but nothing ached more than having to go back home and leave the beautiful and vibrant historical city!

I wanted to share some of the pictures I snapped, and I am sure that you will agree with me when you see the beauty of the buildings!

On the First Day we went to visit the Vatican as we stayed in a hotel that was around a 10 minute walk from it. It was so much bigger and more beautiful than I was expecting and had all of these statues (the ones in the picture above) around the top of the church. Inside was exquisite with paintings, carvings and statues all over the church. 

One of the swiss guards at the Vatican

Me (on the right) and my sister (on the left) having our first meal in Rome. My sister isn't vegan so she had no problem enjoying the delicious Italian meals without feeling slightly guilty while doing it! Haha :)

Even the street lamps were beautiful! 

Almost every house had window boxes with amazing plants growing out of them. I think I am going to reintroduce this in London as it makes everywhere look more cheerful and beautiful! 


On the second day we went to ancient Rome and the Colosseum, which I found fascinating as most of the buildings were over 2000 years old but still standing and still had character and beauty! 

In some of the ancient buildings artists had come and put modern pieces of art inside which I really liked because it showed the contrast between ancient art and modern style. 

Another beautiful window box

I think this building was a monument for something, but whatever it is, IT IS AMAZING!! This was probably the most amazingly beautiful and ornate building I saw in Rome, let alone THE BIGGEST!!!!! When you are up close to it you realise just HOW HUGE it is!! I loved it! :) 

My granite (I think that was what it was called), it was so delicious and refreshing (but not so healthy). So soon I want to post a healthier version of it on this blog, which will be perfect for the hot summer we are having! 

Ancient Rome 

These amazing sculptures and fountains were everywhere. You would turn through a few small windy Roman alleyways and then...BOOM it would open up onto a large Piazza with beautiful fountains, art and street sellers and a buzz of shops and restaurants! 

Share this Post Share to Facebook Share to Twitter Email This Pin This

Cheesy Crispy Kale Chips


I used to be the most dedicated and addicted CRISP FAN!!! (I think everyone has had that stage) Kale chips are THE PERFECT solution to stop the craving, I promise!!!! I remember going to Whole Foods in America and they had them as samples and they were DELICIOUS. However I came back to England and they were around £8 for a small box of them!! SO I decided to find out how to make my own and it is SOOO easy and cheap to make.  I want to share this with you so that you can have a healthy snack too!


Ingredients 

  • 2 tbs of olive oil 
  • 1 bunch of mixed kale 
  • 2 tbs of nutritional yeast 
  • 1/2 - 1 tsp of salt 

Method 

  1. Pre heat your oven to 130 degrees celsius OR set your dehydrator to 45 degrees celsius
  2. Tear off the leaves of the Kale so that you only have leaves and no stalk/ rib of the kale. The leaves should be torn into a crisp like size.
  3. In a mixing bowl thoroughly cover the kale with the other ingredients so that all the leaves are coated in the mixture. 
  4. Lay out on greaseproof paper and bake in the oven for 20 - 30mins or until very crispy and dried out. OR lay of dehydrator trays and dehydrate overnight (around 6 - 8 hours). 
  5. Enjoy as a lunch box snack! 

Share this Post Share to Facebook Share to Twitter Email This Pin This

Bursting Berry Sorbet


My mother makes this sorbet almost EVERY single morning in the vita mix - it used to drive me mad, as anyone with a vita mix will know that it is VERY loud! However she has made it so much I don't even notice it anymore! BUT the taste of it is worth even the 3 minutes of booming noise that it takes to make it! It is smooth and sweet and delicious and healthy all rolled into one frozen treat!


Ingredients 

  • 40g of frozen raspberries 
  • 50g of frozen blueberries 
  • 30g of frozen dark sweet cherries 

Method 

  1. Put al the frozen ingredients into the vita mix and turn on to the highest power for around 3 mins or until completely smooth. You will have to do a bit of pounding it down with the lid plug to get it moving. 
  2. If it really isn't combining (it should be but I know sometimes it is difficult) add around 2 tbs of non-dairy milk. 
  3. Serve up and eat quick before it melts! 


Share this Post Share to Facebook Share to Twitter Email This Pin This

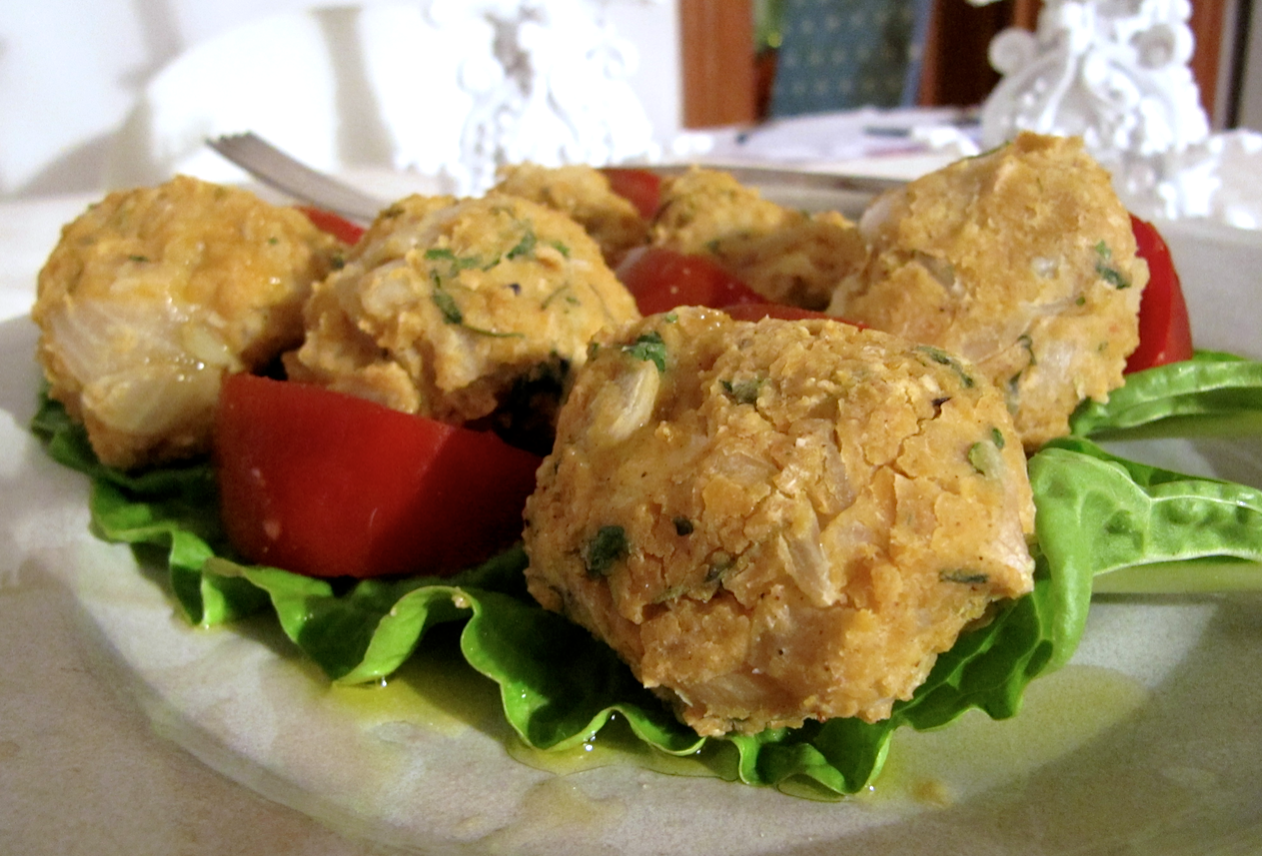
Chickpea Falafel


This falafel recipe I found in the Kimberley Snyder cookbook (which is really good!) and is perfect for dinner or to put in sandwiches. I love it so much that I had to share the recipe with you! 


Ingredients

  • 1 can cooked chickpeas 
  • 1 tbs of vegetable broth 
  • 1 finely chopped onion
  • 2 garlic cloves 
  • 3 tbs of chopped fresh parsley 
  • 1 tsp of lemon juice 
  • 1 tsp of olive oil 
  • 1 tsp of ground coriander 
  • 2 tsp of cumin 
  • 2 tsp of garam masala 
  • 1/2 tsp of chilli powder 
  •  2 tbs of gram flour/ other types of flour
  • 1 tsp of baking powder 
  • 1/2 tsp of sea salt 
  • black pepper to taste 

Method 

  1. Preheat the oven to 180 degrees celsius. Spread a baking sheet with greaseproof paper
  2. Put the chickpeas into a food processor to mash them up 
  3. Heat the vegetable both in a frying pan and add the chopped onions and minced garlic. Cook until the onion in translucent 
  4. In a mixing bowl add all the ingredients, including the garlic, onion and chickpeas. combine the ingredients thoroughly 
  5. Form the mixture into small balls and place on the greaseproof paper. Bake in the oven for around 50 mins, flipping them over after around 25mins. 
  6. Serve with a salad. Enjoy! 
Share this Post Share to Facebook Share to Twitter Email This Pin This

Juice Pulp Mini Muffin Bites/ Mini Cake for two


So here is another recipe that will be a great way to use your leftover juice pulp in! I made a carrot, apple and lime juice - but I am sure this will work with other juices as well. They are absolutely delicious (especially when you make the cream 'cheese' frosting with them!) and you won't even know that they are mostly made from juice pulp!

You can either make these into little mini muffin or into a mini cake for two. OR there is enough in the recipe to make both (I did!)


Top with crushed walnuts and lime zest


Sprinkle lime zest of the top of the muffins for a pretty and colourful effect! 

Ingredients 

(Makes around 24 mini muffin or 15 mini muffins and a mini cake or 1 big cake or 2 - 3 mini cakes!) 
  • 300g of juice pulp (I used a mix of carrot, apple and lime) 
  • 275ml of oat milk/ almond milk (or other non dairy milk)
  • 1 tbsp of coconut oil 
  • 1 tsp of vanilla extract 
  • 2tsp of egg replacer + 2 tbs of non dairy milk 
  • 65g of coconut flour 
  • 65g of maize flour 
  • 60g of brown rice flour 
    • With these three flours you can just use normal flour or just one of the flour types - make sure it adds up to 190g - I use these three together because I think the flavour is the best!
  • 2 tsp of baking powder 
  • 3 tbs of xylitol 
  • 2 tbs of coconut sugar 
  • 1 stevia packet 
  • 1 tsp of cinnamon 
  • 1/2 tsp of ginger 
  • 1/2 tsp of nutmeg
  • Optional: A handful of raisins, a handful of chocolate chips, 40g of desiccated coconut etc. 

For the Cream Cheese frosting 

  • 200g of soy greek yogurt (or make your own- instructions below)
  • 1- 2 tbs of lemon juice (depending on how lemony you want it) 
  • 1/2 tsp of vanilla extract 
  • 1 packet of stevia / 1 tbs of maple syrup/ honey 

Method 

  1. Pre - heat the oven to 200 degrees celsius. Grease mini muffin tin with coconut oil. Or if you are making the cake grease two ramekins, mini cake baking tins or I used circular metal ring potato pancake moulds. Use two of whatever your using for the cake so that you have two layers 
  2. Combine the dry ingredients (bottom 10 ingredients on the list + desiccated coconut if using) in one bowl and combine the wet ingredients (APART FROM the egg replacer and non- dairy milk blend, don't make this blend until the very end though), which are the top 4 ingredients separately in another bowl. 
  3. Once both wet and dry are separately thoroughly combined mix them both together. 
  4. Mix the egg replacer with the 2 tbs of milk and knead it into the wet dough mixture. 
  5. Then add your optional ingredients, e.g. the raisins/ chocolate chips 
  6. Add the dough to your muffin tin or press dough into the ramekins, baking tins or metal ring moulds. Bake for 20 - 25 mins. 
  7. Take out of the oven AND MAKE SURE YOU LET COOL for at least 15 mins before taking them out of the moulds. I made the mistake of trying straight away and they fell apart, however with the next batch I let them cool and they popped out really well! 
For the Cream cheese frosting 
  1. To make your own greek yogurt take 250g of soy yogurt and tip it into a nut bag. Put the nut bag in a fine mesh sieve. Rest the sieve over a bowl and refrigerate overnight. In the morning you should have VERY thick greek yogurt and liquid in the bottom of the bowl. Discard the liquid and use the greek yogurt for this recipe!
  2. Whip together all the ingredients in a bowl and spread on top of the mini muffins. Or put in between the two layers of the cake and on top of the cake. 


Thursday, 1 August 2013

Share this Post Share to Facebook Share to Twitter Email This Pin This

Rainbow Revive Juice


This juice looks so beautiful when you make it and is soooooo good for you when you drink it! I included as many good vegetables as I could to make this juice a super revive and energising drink while getting in all the vitamins and good things that you need.

Look how beautiful it is!


When you mix it all together it makes a pretty pink juice!

Ingredients

(Serves 1 - 2) 
  • 4 large carrots 
  • 1 pear 
  • 1 apple 
  • 1 beetroot 
  • 1/2 a lemon/ lime 
  • 1/2 - 1 celery stalk 
  • 1 handful of spinach 
  • 1 inch cube of fresh ginger 
  • 1/4 of a cucumber 

Method 

  1. Put all ingredients through the juicer (make sure you wash the vegetables). IF you are going to make my vegan burgers then make sure you add the ginger and lime/ lemon last. Take out the pulp from the other veg and save it before you run the ginger and lemon/ lime through. You don't want gingery or limey/ lemony burgers! If you are making the carrot cake or muffin bites then only conserve the pulp that you need, i.e run the carrots through first and collect the pulp in a separate container for the carrot cake. 
  2. If you want the separated, rainbow colour effect put the glass straight under the juice feed so that the juice goes straight into it. 
  3. Enjoy :)