Tuesday, 30 July 2013

Share this Post Share to Facebook Share to Twitter Email This Pin This

Mini Carrot (Juicer pulp) Cake for two


This is a great way to use carrot pulp left behind by juicing, but if you don't have a juicer don't worry you can still make it too!


 This is honestly so easy to make and so delicious too!


I served my cake with thick banana cream which I will add to this recipe too.


Ingredients 

(makes one small cake) 
  • 50g of coconut flour 
  • 50g of maize flour 
  • 2 tbs of brown rice flour 
    • With the top 3 flours you can just use normal flour or just one of the 3 flours (110g of flour is needed) but I like this combination
  • 1 tsp of baking powder 
  • 1/2 tsp of baking soda 
  • 1 packet of stevia 
  • 3tsp of xylitol 
  • 2tsp of coconut sugar 
  • 2 tsp of egg replacer 
  • 1/2 tsp of cinnamon 
  • 1/4 tsp of ginger 
  • Pinch of salt
  • 150g of carrot pulp / if not using carrot pulp then boil around 150g of carrots until soft and then blend to form a carrot paste 
  • 5 tbs of oat dream/ oat milk  - or if not using carrot pulp then use 3 tbs of oat milk 
  • 1 tsp of coconut oil + extra for greasing 
  • 1 tsp of vanilla extract

For the cream 

  • 160ml of coconut cream (poured out of the can into a bowl and refrigerated for 1 - 2 hours) 
  • 1/2 a frozen banana 
  • 2 tbs of carrot pulp 
  • 1/2 tsp of vanilla extract 

Method 

  1. Preheat the oven to 200 degrees celsius and grease 2 - 3 large ramekins (I used heart shaped ones!) or very small baking tins with coconut oil. Each tin will be a layer of the cake, so if you want 2 layers then use two tins/ ramekins and if you want  3 layers use 3 tins/ ramekins 
  2. Combine all of the dry ingredients into a bowl (top 11 ingredients) 
  3. In a food processor combine the carrot pulp/ boiled carrot paste and the milk 
  4. In a mixing bowl mix all of the wet ingredients including the carrot pulp and milk. 
  5. Now thoroughly combine both wet and dry ingredients until it becomes a dough.
  6. Press the dough into the baking tins/ ramekins and bake for 20 - 30 mins 
  7. While they are cooking blend all the cream ingredients EXCEPT the coconut cream in the vita mix/ high powered blender until smooth. Whip the coconut cream and then whip in the blended ingredients (frozen banana etc.) into the coconut cream. 
  8. Take the cakes out of the oven and pop out of the ramekins/ baking tins. Arrange so that the cream goes in between the layers and all over the top. Top off with extra carrot pulp and serve! 


Share this Post Share to Facebook Share to Twitter Email This Pin This

Cleansing Carrot and Cucumber juice

This juice was supposed to be part of my juice cleanse - although I haven't been very good at it and have craved and given in to eating solid food - maybe I need a bit longer to store up enough will power! However even though I haven't been totally juicing, I have been juicing! So here is one of my juices that will cleanse your body...

So I read up about what is really good for you in a juice and this is what I found:

  • Cucumber juice: Helps your skin, hair and nails as it helps draw the dirt from your pores. Also it contains minerals that help strengthen your nails. As it is mostly water it is great at cleansing toxins from your body. Most importantly in the juice there is important compounds that help block the development of cancer cells inside your body. 
  • Carrot juice: Detoxes the liver meaning that your whole body benefits! 
  • Celery juice: Richly dense in minerals and vitamins (like Vitamin A and B) It also lowers cholesterol and blood pressure. It is very good at restoring the pH balance in the body which is needed for good health. 
  • Lemon juice: VERY good for your skin - it cleanses the body and helps your skin be RADIANT ! It is rich in anti-oxidents and can help prevent heart failure. 


Ingredients 

  • 4 large carrots 
  • 1/2 a large cucumber 
  • 1 - 2 celery stalks 
  • 1 green apple 
  • 1 lemon (I would peel it before juicing but for a stronger lemon flavour then leave on the peel) 
  • Optional: Ice cubes 

Method 

  1. Wash and cut of tops of the carrots and put through the juicer. Collect the pulp as you can use it in cooking, baking and salads. (Use it for this Carrot Cake recipe) 
  2. Put all the other ingredients into the juicer. Add ice when you serve it. 
  3. Enjoy (hopefully) - if you don't like the taste just remember all the good things it is doing for you!

Monday, 29 July 2013

Share this Post Share to Facebook Share to Twitter Email This Pin This

Fresh Pasta and Pesto

This is a classic Italian dish that is so easy to make! I love pasta and pesto and before I became vegan it used to be the fall back dish that we used to make a big pot of with tuna thrown in. So when I was in Rome I just had to try the authentic Italian pasta and pesto dish (which was very delicious but not very vegan!)

The 'fresh' pasta is fresh courgette made into spaghetti, but believe me when it is smothered in pesto it tastes like fresh egg pasta!

Ingredients 

(Serves 1 - 2) 

  • 1 courgette 
  • Enough Vegan Pesto to completely coat the courgette pasta (use this pesto recipe) 
  • 1 handful spinach 
  • 1 tbs of brown rice flour 
  • Salt and pepper to taste 
  • Fresh Basil to garnish 
  • Optional: 5 cherry tomatoes 
  • Optional: Drizzle of extra virgin olive oil 

Method 

  1. Spiralize the courgette to make it into spaghetti strands or julianne into thin spaghetti strips 
  2. Mix courgette in a bowl with the brown rice flour (I use the flour to bulk it out but also dry the courgette slightly so the strands don't stick together) 
  3. Mix in the spinach with the courgette and smother it all in vegan pesto 
  4. Top off (if you want) with olive oil and cherry tomatoes and the basil to garnish 
  5. Serve! 


Share this Post Share to Facebook Share to Twitter Email This Pin This

Secretly Vegan Pesto

Having just come back from my holiday to Rome (sorry I had to go on a break from being Vegan!) I decided to recreate some of the extremely delicious Italian dishes I had but vegan style!

On arriving in Rome I was immediately in awe of all the beautiful buildings, no out of place block of flats or grey concrete office buildings like in London. Walking through the streets was like walking in the past, as the roads were made from smooth cobbles and the streets were so small and windy. Some of the churches and cathedrals were over 2000 years old but were still so impressive and fascinating!

BUT don't get me started on Italian food....!!! IT. WAS. DELICIOUS. Homemade fresh pasta, thick tomato sauces and strong herb flavours, I was in food heaven!! So as I have holiday blues and miss the city of food and history, I am going to immerse myself (and this blog) in trying to recreate the Italian dishes I had!

First up: Secretly Vegan Pesto - I say 'secretly' because I think this pesto tastes absolutely authentic! I even had taste testers (mainly my sister) who said that she gave it a 9 / 10 for taste and closeness to the real pesto (which is packed with cheese). The only reason she didn't give it a 10 / 10 is because she didn't think I put enough oil in it (but I like to keep mine low calorie and low oil so I will put two measurements on the recipe - one for those who don't want too much oil in theirs and others who want it more authentic). Another point to make about it is that I made mine in a bullet blender which made it quite smooth and mixed up, so if you want yours to also look even more authentic do it in a food processor.


Ingredients 

(Makes a small jar full)

  • 2 large handfuls of fresh basil (I used mine from my garden) 
  • 1 tbs of nutritional yeast 
  • 50g of pine nuts  
  • 1 1/2 tbs - 3tbs of olive oil 
  • 1 handful of spinach  
  • 1 clove of garlic  
  • Salt and pepper to taste 

Method

  1. Put all ingredients in a food processor (I did mine in a blender but I think it would work better in a food processor) 
  2. Put on your favourite pasta or use this recipe for it! 


Share this Post Share to Facebook Share to Twitter Email This Pin This

Coconut Confetti Ice Cream Pie

This is my first big pie that I have tried to make and I am really proud of myself for the way it turned out! :) This pie will probably need to be frozen overnight so make sure you plan making it in advanced (I always forget to do that when experimenting!)

I had soooo much coconut milk leftover from previous recipes and decided that I should make a vegan coconut cream pie with it. I looked up a recipe for coconut cream pie

In the recipe I have added raspberries to the ice cream base, but you can't see this in the pictures! This is because I made this pie without them, however I put the raspberries on the top of the pie purely for visual effect when taking the photos and when I tried them with the pie they tasted REALLY good with it. So I have added them to the recipe as I think they make the pie even better!


Ingredients 

For the Base 

For the Ice cream 

  • 4 frozen bananas 
  • 50g of frozen raspberries 

For the Coconut Cream 

  • The non liquid part of a full fat coconut milk can (1 can)
  • 1/2 packet of silken tofu 
  • 1 tbs of cocoa powder 
  • 1 tbsp of maple syrup/ honey (can substitute 1/2 packet of stevia but I prefer with maple syrup) 
  • 2tsp of egg replacer 
  • 1tsp of vanilla extract 
  • 1 tbs of corn flour
  • Optional: 1 - 2 tbs of desiccated coconut 
Optional: Toppings such as chocolate sauce (use the chocolate syrup recipe from the frappuccino recipe), raw cacao nibs, desiccated coconut, frozen raspberries 

Method 

  1. Pour the contents of the full fat coconut milk into a bowl and put in the fridge uncovered. Leave in their for an hour. The top should get very thick. Only use this part for the recipe and throw away the liquid left at the bottom. 
  2. To make the base omit the desiccated coconut from the cookie dough truffles recipe and don't make the dough into separate balls. Press the dough into a pie dish, I would suggest the crust be quite thick so use the whole recipe. 
  3. Then, in a high powered blender (like the vita mix) blend the banana and raspberries until the consistency of ice cream. Fill the bottom of the pie with the ice cream and place in the freezer while making the cream. 
  4. In a blender blend the silken tofu. Then with a electric whisk, whisk together all ingredients until they are completely blended together. 
  5. Pour the cream into a saucepan on a low heat and keep stirring until boiling point. The cream should get a bit thicker. Take off as soon as it starts to boil. 
  6. Put the cream into the fridge to cool down (I'd leave it for half an hour) 
  7. When the cream has cooled pour it over the ice cream layer and freeze for a minimum of 3 hours. Put toppings on. 
  8. When ready to serve make sure you thaw the pie for around 20 - 30mins before cutting into slices . Enjoy! 


Share this Post Share to Facebook Share to Twitter Email This Pin This

Cookie Dough Truffles!

This recipe I came up with by accident. I wanted a quick and sweet snack so I just blended random nuts that I had with some dates and the result tasted just like cookie dough - it was delicious!!! This recipe can also be used for pie crusts or energy bars as well :)


Ingredients 

(Makes around 10 truffles) 
  • 7 SOFT dates (or if they are quite dry then leave them in warm water overnight) 
  • 20g of cashew nuts 
  • 40g of walnuts 
  • 60g of almonds 
  • For decoration: Desiccated coconut / cocoa powder  / sesame seeds etc. 

Method 

  1. Blend all of the ingredients (except ones for decoration) in a vita mix until doughy 
  2. Break the dough into little truffle sized balls 
  3. Roll the truffles in the ingredient you want to use as your decoration 
  4. Eat up and enjoy! 


Thursday, 25 July 2013

Share this Post Share to Facebook Share to Twitter Email This Pin This

Geography Revision Notes - GCSE (Edexcel B)

These notes cover all the topics you will need to know for Edexcel B. I recommend that after you read through the notes you make flashcards to help you remember them (I did and it really helped!)

Geography Snapshot Notes DYNPL

Geography Snapshot Notes PPL

Share this Post Share to Facebook Share to Twitter Email This Pin This

English Literature Revision Notes - GCSE (AQA)

I spent so long making these notes that I don't want them to go to waste just on me - so I hope someone out there finds them useful for their exams or just interesting to read! The books I covered for the exam was Great Expectations, Romeo and Juliet and Under Milk Wood. The exam board I took was AQA.

Great Expectations Themes

Romeo and Juliet - Notes

Themes in Under Milk Wood

Under Milk Wood - Character Study

Share this Post Share to Facebook Share to Twitter Email This Pin This

History Revision Materials - GCSE (OCR)

Sorry it has taken me so long to upload these revision materials! But here is my first set of revision documents for history. My exam board was OCR for history and we were doing America 1919 - 1975 and the British Depth Study. I hope someone finds these helpful! :)


These first three documents cover America from around 1919 - 1975 including the boom, bust, cold war, Cuban missile crisis and the Vietnam war.

History America 1919 - 1939 by Skye G-s

History -Cold War and the Cuban Missile Crisis

History - Vietnam

These next three documents go through all the things you will need to know about Britain from around 1890 to 1918. It covers attitudes towards women and the suffragette movement, the liberal welfare reforms and the home front during world war one.

The Home Front

The Liberal Welfare Reforms 1906

Women and the suffrage movement

Hope all these revision documents help you with your OCR GCSE, or for anyone who just is interested in History! :)
Share this Post Share to Facebook Share to Twitter Email This Pin This

Heavenly Chocolate mousse

This chocolate mousse is angelic, so seriously light!
One thing I never liked about real mousse (when I wasn't vegan) is that usually it would leave me feeling quite heavy - but with this one it both tastes like real mousse and doesn't make you feel heavy! (I think this qualifies it as being the perfect chocolate mousse!)

Heavenly...... 


Ingredients 

(Makes around 3 mini mousse bowls full) 
  • 2 cans of coconut cream (2 x 160ml cans) 
  • 1 1/2 tbs of cocoa/ cacao powder (more if you want it more chocolatey than I have it in my picture) 
  • 1 tsp of vanilla extract or seeds from 1 vanilla pod
  • Sweetener to taste (I would use around 2 tsp of maple syrup or honey or 1 packet of truvia/ stevia  - but use more or less depending on how big your sweet tooth is!) 

Method 

  1. Pour out the coconut cream into a bowl and whip it up until all the coconut cream and liquid are combined
  2. Place the coconut cream in the freezer for 45 mins to an hour - the top of it should be slightly frozen 
  3. Now add the cocoa powder and sweetener and vanilla and whip up with an electric whisk until all combined 
  4. Serve in small mousse bowls. You could add chopped fruit of chocolate sprinkles to the top to make it look pretty! 

Share this Post Share to Facebook Share to Twitter Email This Pin This

Super Duper Fothy Frappuccino

I had this Frappuccino for breakfast this morning and...

IT. WAS. SO. DELICIOUS. 

I would say BETTER than the Starbucks version as I found it both more filling and not as sickly.

I. LOVE. IT (Ok I will stop with the caps lock and full stop thing now! :) I think I have got across how good it is). 

Both creamy, sweet, icy and perfection for breakfast. I highly recommend trying it! 

If you are not convinced already hopefully you will be by these photos I snapped before I gulped it down!

I am quite proud of these pictures - as you may be able to guess as I uploaded so many haha! :) 


GOING...
Going...


Going...

GONE!

Ingredients 

(Serves 1)
  • 200 ml of almond milk 
  • 1 frozen banana 
  • 1 tsp of instant coffee
  • 1/2 tsp of vanilla extract 
  • 1 stevia packet / 2 tsp of maple syrup or honey / 1 1/2 tsp of sugar etc. 
  • Sprinkling of salt 
  • Otpional: Handful of crushed ice 

Method 

  1. Blend together all the ingredients except crushed ice if using at the highest power on your blender. 
  2. If using the crushed ice : Add the crushed ice and take it down to a lower power just to mix it up a bit - don't blend to long maybe only 5 seconds just to make sure it is mixed. 
  3. Pour into a large mug and enjoy 

Whipped Cream top 

  • The top of a can of full fat coconut milk (the really thick part at the top) 
  • 1/2 tsp of vanilla extract 
  • 1 tsp of maple syrup/ honey/ xylitol 
Whip all the ingredients together and put on top of drink - should float! 

For the Chocolate sauce 

  • 1 tbs of melted coconut oil 
  • 3/4 tbs of cocoa powder 
  • 1/2 tsp of maple syrup/ honey/ xyltiol 
Mix all ingredients together and pour onto the drink. 


Wednesday, 24 July 2013

Share this Post Share to Facebook Share to Twitter Email This Pin This

Finger food Spring Rolls

At the moment I am on a program that we have in England called the Challenge. It is a three week program of different challenges for teenagers who have finished their exams and have a long summer holiday ahead of them with not much to do. 
It has been REALLY fun, with the first week starting in the Lake District doing canoeing, rock climbing, gorge walking and hiking and this second week taking place at Greenwich university where we have to live on £10 a day and get a feel of what university life is like. Unfortunately living with 5 other people in the flat means I had to put my vegan diet on hold! However now that I am home I can not wait to start it again (I know I never thought I would be excited about being vegan, but it has become a serious passion!) I have a couple of days home and then start my last week which is supposed to be a bit like the young apprentice where we have to create a product and try and sell it for fundraising. 

So, back on track with what this post is actually about, these spring rolls are something that I think are really quick, cheap and easy to make for a meal of finger food! 


These spring rolls are amazingly filling - I ate 3 for lunch and it filled me up! They are full of vegetables so are also really good for you so eat up! :)


Ingredients 

(Makes around 15 - 20 spring rolls) 
  • 15 - 20 rice spring rolls wrappers (I used the brand blue dragon) 
  • 5 small mushrooms 
  • 1 onion 
  • 1 carrot (peeled)
  • 1 leek 
  • 1 garlic cloves 
  • 1/2 tsp of ginger 
  • 1 tsp of sesame oil 
  • 1 tsp of tamari / soy sauce 
  • 2 tbsp cornflour 
  • 1 bowl of hot water + 2tbs of hot water
  • Optional: serve with soy/ tamari sauce 

Method 

  1. Soak the mushrooms in hot water for 5 minutes. While they are soaking chop up the onion into very small chunks, the carrots into very fine sticks and the leeks into fine circles. Mince the garlic and add to the chopped vegetables. 
  2. Take the mushrooms out and slice them finely. Mix all of the vegetables, cornflour tamari and sesame oil together in a mixing bowl.
  3. Put the vegetables in a frying pan with 2 tbs of water and cook them for around 5 minutes. Take them out and put them back in the mixing bowl. Wait around 10mins while they cool down.
  4. Dip the rice wrappers into the hot water for a quick moment until softened and workable. 
  5. Add around a tbsp of the vegetable mixture to the centre of the rice wrapper. Now for the more tricky bit: Fold the two opposite sides of the wrapper in to the centre then roll up the spring roll (With this really just do it in a way that looks right!) 
  6. Heat up a pan to a high heat with a mix of sesame oil and water (I would use around 1 tsp of sesame oil and 2 tsp of water ratio) - if you are not worried about using oil and your calorie intake you can just go ahead a use straight oil with no water. 
  7. Steam fry the spring rolls on both sides for around 3 minutes in the pan (do this in batches as you will have a lot) 
  8. Then return all the spring rolls to the pan, cover with around 75ml of water and put a lid on the pan. Steam the spring rolls for around 10 - 15 minutes. 
  9. The water should have all boiled off, but if it hasn't then don't worry. Take out the spring rolls and serve with tamari or Spring roll sauce (see below recipe). 

Spring Roll Dipping Sauce 

  • 3 tbs of tamari 
  • 2tbs of brown rice vinegar 
  • 1/4 tsp of sesame oil 
Mix together all these ingredients and serve with spring rolls (like the ones above!) 

Friday, 19 July 2013

Share this Post Share to Facebook Share to Twitter Email This Pin This

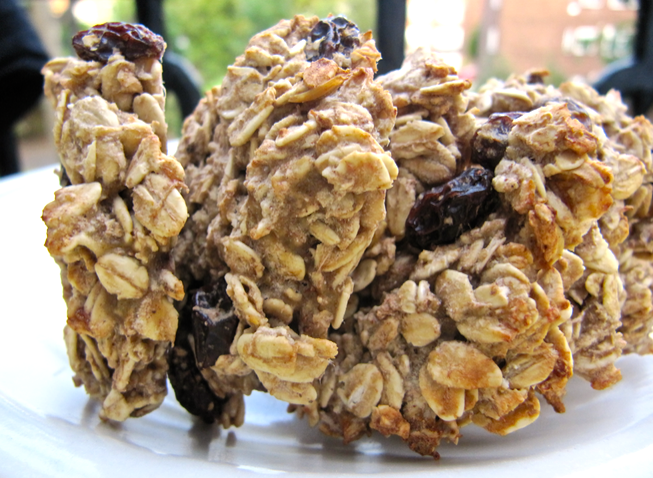
Oatmeal and Raisin Cinnamon cookies

These cookies are a great packed lunch snack with a secret vegan twist (I know most of you won't care but for some reason I get embarrassed when my packed lunch looks too vegan!) They are both secretly healthy and delicious at the same time (my favourite combination!)


Ingredients

  • 80g of oats (preferably rolled oats) 
  • 2 tbs of coconut flour 
  • 2 tbs of coconut sugar (use normal brown sugar if this is too difficult to find or alternatively you could use a 3 tbs of syrup like honey/ maple syrup or golden syrup) 
  • 1 very ripe banana 
  • 1 handful of raisins 
  • 2 tsp of cinnamon 
  • 1 tsp of baking powder 
  • 2 tbs of peanut butter (sub in other nut butter too if you don't like peanut butter) 
  • Optional: If the mixture is too dry then add 1 - 2 tbs of milk (like oat or almond milk)

Method 

  1. Preheat the oven to 180 degrees celsius 
  2. Mush up the banana and then add the oats - mix together well 
  3. Add all other ingredients and mix together thoroughly with a fork 
  4. Grease a baking tray with coconut oil OR put down greaseproof paper on top of the baking tray. Take about 1 1/2 tbs of mixture and make into cookie shapes on the tray 
  5. Bake for 15 - 20mins (Until they go golden brown and the edges go dark) 

Share this Post Share to Facebook Share to Twitter Email This Pin This

Homemade coconut butter

Now coconut butter is a very useful ingredient in vegan cooking as it can replace normal butter and has a rich and creamy coconut flavour. However it is quite expensive to buy! One jar of coconut butter is around £6 (350ml) - but homemade coconut butter can cost £3 (at most) to yield the same amount.
You will need a HIGH power blender (like the vitamix) - if you don't have one of these then... it might cost you a little more to make it!


Look how smooth and creamy it turns out! (It is slightly melted as it is summer time!) 


Ingredient (Only one!) 

  • 400g of toasted coconut chips/ dried coconut 

Method 

  1. Pour the coconut chips into a high power, high speed blender 
  2. Blend on the top speed for around 5 mins - or until it looks creamy and liquidy and it is clear that the oil has been released. If it still looks too dry then you can always add around 1/2 a tbs of coconut oil but I honestly don't think it will need this 
  3. SIDE NOTE: If you are using a food processor then it will take around 10mins to make on the highest power setting 


Share this Post Share to Facebook Share to Twitter Email This Pin This

Sweet Potato Curry

Recently I have decided to get into gardening as, obviously, I cook a lot (and especially a lot of vegetables!) So on my balcony I have a small herb garden and some vegetables growing, and I have become very obsessive over it! Every time I go out I worry about my plants and how they are faring - mainly because I leave my mum in charge of looking after them and.... lets just say she managed to kill a house cactus plant! So in this recipe i included some of the herbs I am growing in my garden (which was very exciting to do for the first time!)

This curry is meaty and filling and you can make it as hot or mild as you like!


Ingredients 

(serves 3) 
  • 3tbs of tomato puree 
  • 2 large tomatoes
  • 1/2 a sweet long pepper 
  • 1 can of kidney beans
  • 70g of sweetcorn 
  • 1 large sweet potato 
  • 200ml of water 
  • 1/2 a courgette 
  • 1 1/2 tsp of garam masala 
  • 1 1/2 tsp of cumin 
  • 1/4 tsp of hot chilli powder (or more if you want it spicier) 
  • 1 clove of garlic 
  • 1/4 tsp of fresh ginger 
  • 1 veg stock cube
  • Optional: 1 onion 
  • Optional: 1 carrot 
  • Optioanl: 4 red chillies 
  • Garnish: Basil (fresh from the garden!) 

Method 

  1. Mix the water, tomato puree, garlic, ginger and stock cube together in a sauce pan on a high heat
  2. Chop up all vegetables: sweet potato into cubes, peppers into small slices, tomatoes into small cubes, courgette into cube chunks (and also onion, carrots and chillies if using) 
  3. When the water has boiled add all the chopped vegetables 
  4. Put the lid onto the pot and let simmer for around 10mins 
  5. Add the spices, beans and sweetcorn to the curry 
  6. Put lid back on and let cook for around 30mins (or until the potato is soft) 
  7. Dish up and serve - garnish with the basil 

Sunday, 14 July 2013

Share this Post Share to Facebook Share to Twitter Email This Pin This

Super Frothy Chocolate Milkshake

This is a delicious morning milkshake that will stop you ever wanting or craving a 'real' one (not that this one isn't real also!). It froths at the top if you use a vitamix or other powerful blender!


Already have drunk some...oops! Sorry had to do a quick taste test beforehand!

Ingredients 

  • 200ml - 300ml (depending on how large you want it to be) of non-dairy milk (I used unsweetened almond milk) 
  • 1 frozen banana (I would cut up into coins before putting in the freezer to make it easier to blend 
  • Handful of raisins / 2 to 3 chopped dates 
  • 1 1/2 tbs of cocoa powder 
  • 1/2 tbs of carob powder
  • 1 packet of truvia 
  • Optional: 1 tbs of nut butter (for an extra creamy protein shake) 
  • Optional: 1 tsp of vanilla essence 
  • Optional: Chocolate sprinkles (vegan kind of course!) / raw cacao nibs 

Method

  1. Put all ingredients in a high power blender and blend until completely smooth (around 30 seconds) 
  2. Pour into a glass and top with chocolate sprinkles / cacao nibs 
  3. Slurp away! 

Saturday, 13 July 2013

Share this Post Share to Facebook Share to Twitter Email This Pin This

Soft Scoop Ice Cream!

Arghhh it was soooooo hot today, and my mum decided to take us to the hampton court flower show (where I picked up some really good herbs for my garden!) and all I could see everywhere was people eating ice cream! So JEALOUS!!! But I am vegan now and have a good amount of willpower. Looking to the future I decided I was going to make my own delicous vegan ice cream so I could share the fun.

So this recipe is for silky smooth vegan ice cream that is so sweet it should make others jealous of YOU! Ha ha :) Enjoy on a good hot summers day (if you can... it is England so I cross my fingers!)

I tried to take pictures of it but the ice cream was already melting so they weren't good (I was taking them outside and it was around 30 degrees celsius!), however I will try and upload some soon (as I definitely will be making this loads.)

Perfect for this hot summer 

Super Soft and Super Creamy! 

Ingredients 

(Serves 1) 
  • 1 frozen banana - note: before freezing cut up into coins and it will be easier to blend
  • 1 - 1 1/2 tbs of fave nut butter (Of course I chose peanut butter) - for silky smooth texture I would go with smooth nut butter but it is up to you
  • 1 packet of stevia / truvia (or 1 1/2 tsp of maple syrup or honey) 
  • YOU MIGHT NEED: 2 tbs of non-dairy milk (like almond milk etc.) 
  • Optional: 1 tsp of vanilla essence / 1 tsp of nuts / 1 tsp of chopped dates / 1 tsp of cocoa powder / sprinkling of cacao nibs (I used this in mine) etc. (You can go crazy with this or stick to the 3 main ingredients) 

Method 

  1. Chop a banana into coins and put into the freezer for a few hours or until hard 
  2. Place frozen banana coins into a high power food processor with the other ingredients and mix until silky smooth 
  3. If the food processor is finding this hard then add a bit of milk (not too much unless you want to turn it into a milkshake!) 
  4. Enjoy! :)

Friday, 12 July 2013

Share this Post Share to Facebook Share to Twitter Email This Pin This

3 Ingredient, Super easy COOKIES!!!

Who doesn't love COOKIES!!!! (Well I do anyway!) These cookies are soooooo quick and easy to make that most of the time is baking time in the oven. The three ingredients I use are the base ingredients but you can add all sorts of different things to spice them up! To mine I added raisins, vanilla essence and cinnamon (to make a cinnamon raisin cookie) but you can also add ginger, dates, nuts, cocoa powder etc. to suit your taste.

These will be gone in two seconds! 

Dip in non-dairy milk for a delicious treat! 

Super Crunchy cookies! 


Ingredients 

(Makes 9 cookies)
  • 80g Oats 
  • 1 very ripe banana 
  • 1 tsp of baking powder 

Optional additives (You don't add all of them (well if you want to then you can :D) just choose a few!) 

  • 3 tbs of chopped dates 
  • 3 tbs of raisins 
  • 1 tsp of cinnamon 
  • 2 tsp of carob powder/ cocoa powder 
  • 1tsp vanilla essence 
  • 1 packet stevia / truvia 
  • 1/2 tbs of maple syrup/ honey 
  • 2 tbs of chopped nuts 
  • Any other ingredients you think of! 

Method 

  1. Pre heat the oven to 170 degrees celsius 
  2. Chop your very ripe banana into coins 
  3. Add all the other ingredients you are using and mush between your fingers until it forms a gooey dough! (If you are one of those people who don't like getting their fingers messy then add all ingredients BUT the oats into a food processor and then mix in the oats yourself) 
  4. Put grease proof paper over the top of a flat baking tray 
  5. By taking about a 1 1/2 tbs of dough for each cookie, shape the cookies on the tray 
  6. Bake in the oven for 15mins - 20mins (depending on how crunchy you want them!) 
  7. Enjoy! 

Thursday, 11 July 2013

Share this Post Share to Facebook Share to Twitter Email This Pin This

BEST EVER Sweet and spicy chai milkshake!

I absolutely love chai tea (you know the unhealthy non-vegan one from Starbucks - it is to die for!) So I decided to make a rich and creamy vegan chai milkshake to stunt my cravings. To be totally honest, I think I now prefer this one! It is so creamy and delicious it completely stopped me wanting the Starbucks one!


Ingredients 

  • 1 Frozen and VERY ripe banana (make sure it is very ripe otherwise it won't be as sweet) 
  • 150ml of your favourite non-dairy milk (I used unsweetened almond milk and it was great!) 
  • 1 packet stevia/ 2 packets of trivia 
  • 2 drops of liquid stevia (or 1 1/2 tsp of maple syrup / honey) 
  • 3/4 tsp of ginger 
  • 3/4 tsp of cinnamon 
  • 1 cardamon pod 
  • 1/2 of a clove (I know it sounds so little but a clove is really strong!) 
  • 1/2 tsp of ground nutmeg 
  • 1/2 tsp of vanilla extract 
  • Optional: Cinnamon stick for serving 

Method 

  1. Blend all ingredients for around 2 mins in a high powered blender until completely smooth 
  2. Pour into a glass a drink up!